
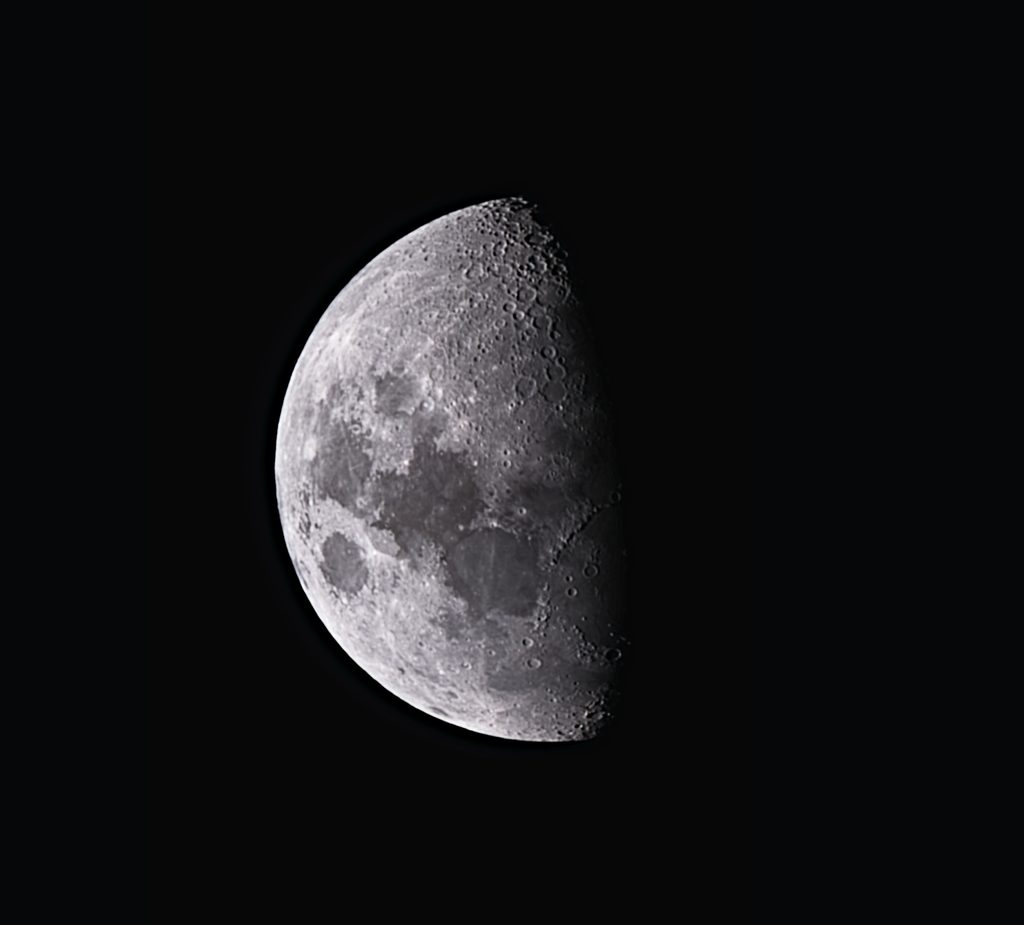
When I first purchased my SeeStar S30 Pro, I was primarily interested in deep sky objects — galaxies, nebulae and star clusters. It wasn’t until I pointed it at the Moon one evening that I realised just how capable this little telescope was for lunar imaging. The detail visible even in a single frame was impressive, but it didn’t take long before I started wondering whether I could push the results further.
That curiosity led me to video stacking — a technique where instead of taking a single photograph, you record a short video of the Moon and extract the best frames from it. The Earth’s atmosphere is never truly still, and even on a clear night, turbulence causes the image to constantly shift and blur. By capturing hundreds of frames in a short burst, you catch brief moments of atmospheric stillness that a single exposure would simply miss. Stack those sharp frames together and you end up with a final image that is cleaner, sharper and more detailed than anything a single shot could produce.
The workflow below is what I finally arrived at after watching multiple instructional YouTube videos and wresting back and forth with Google and Claude Ai to optimise the process. The intention is to get the best possible result from the SeeStar S30 Pro’s 30mm aperture by taking a raw video and processing it though a chain of specialist tools to arrive at a final image.
Capture, Stacking & Sharpening
The goal here is to go from raw video footage to a single, noise-free, well-aligned stacked image. Each tool in the chain handles one specific job, and the output of each feeds directly into the next.
Capture approximately 90 seconds of video with the SeeStar S30 Pro
PIPP
(Planetary Imaging PreProcessing) acts as the initial quality-control and standardization engine in a planetary or lunar astrophotography workflow. It takes raw video files or image sequences (such as MP4, MOV, or SER files), crops and locks the target directly in the center of every frame, discards blurry frames ruined by atmospheric seeing, and exports a quality-sorted, uncompressed file sequence ready for stacking in software like AutoStakkert! or Siril.
Once I’ve captured my RAW (AVI) file from the SeeStar S30 Pro, I load it into PIPP. It’s also possible to take multiple video files (around 90 seconds in duration) and load them as a set which can be joined to produce larger AVI file (the sum of the component video files).
Typical settings are captured in the photo gallery of screenshots below
- Under the Source Files tab, (a) check to see that the file (or multiple files have been loaded). In the case of multiple files, you can select “Join Mode” to create a single video file (b) Select “Solar Lunar Disk Full”
- Input options: (a) untick Debayer Raw image files and (b) “Debayer Monochrome frames” – Bilenear (RGGB)
- Processing Options: (a) tick “Flip vertically” and (b) Enable cropping if required
- Output Options: select Output Format to SER
- Do Processing: click on Start Processing
Note while setting options, click on the Test Options button to check for issues while making changes
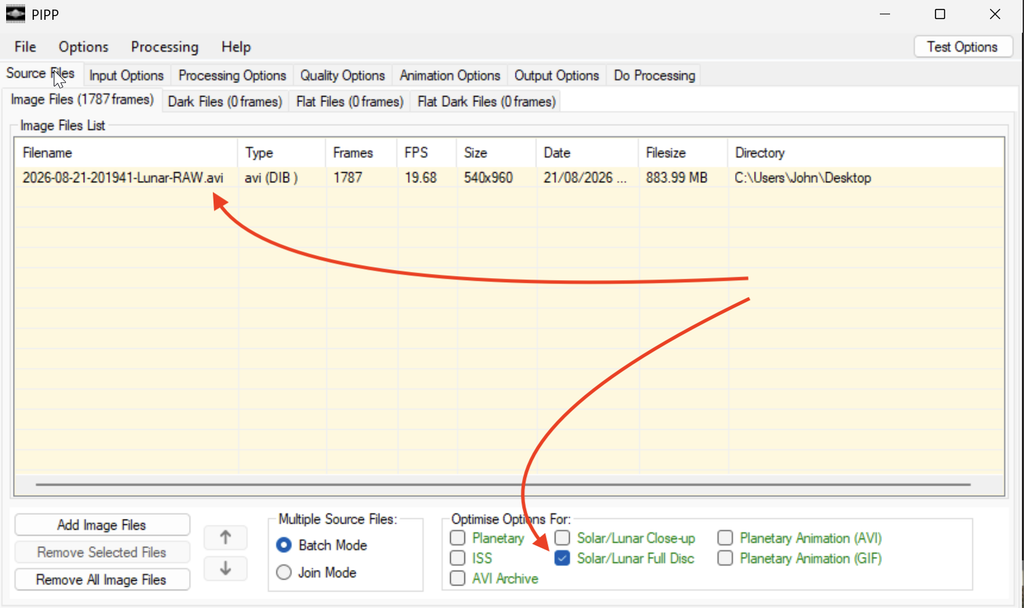
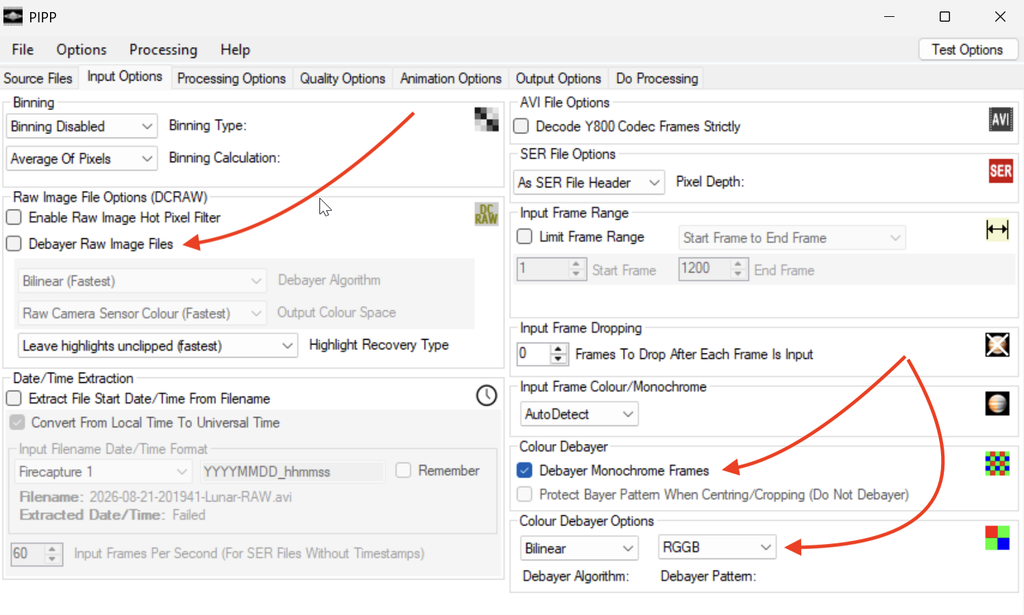
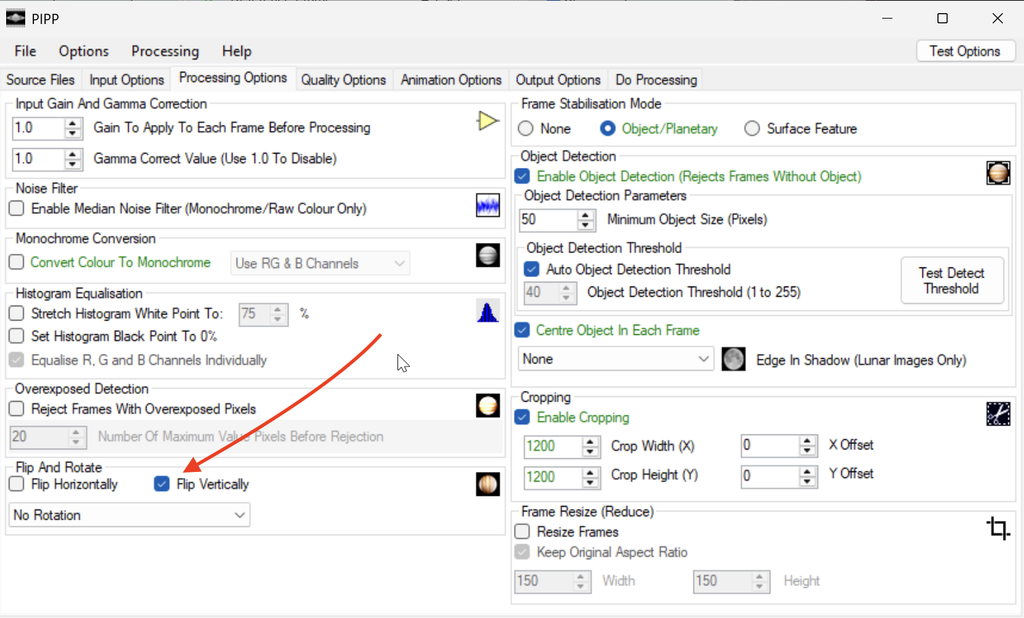
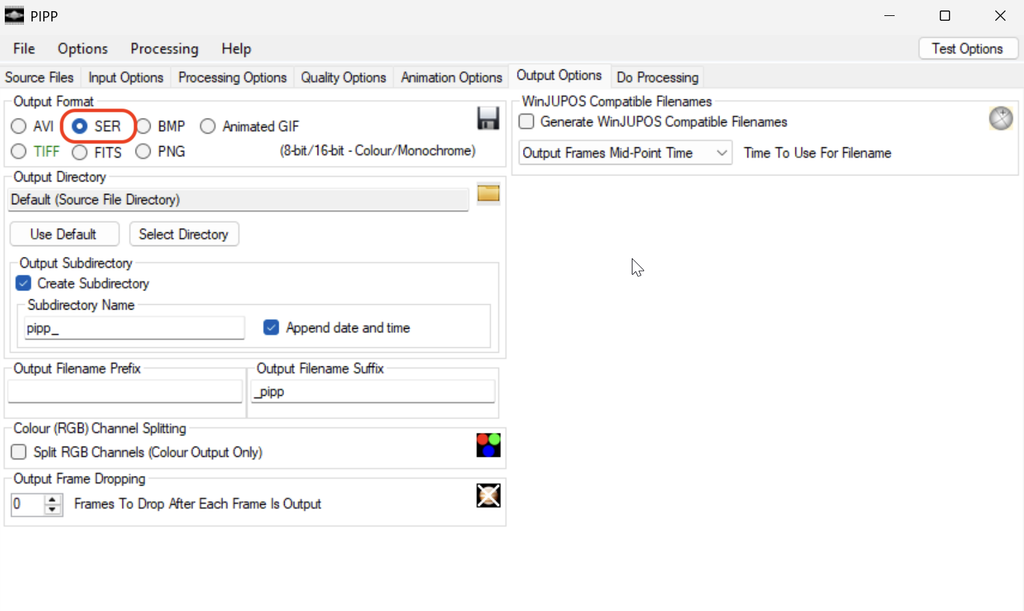
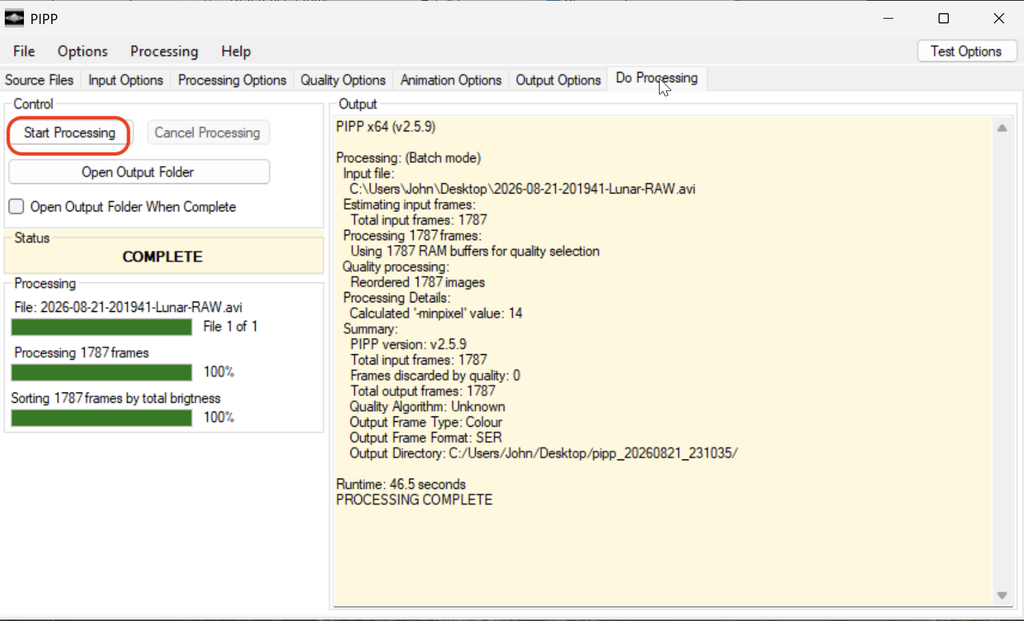
Once all the settings are in place, click on “Start Processing”. Depending on the size of the video file the PIPP processing shouldn’t take more than a minute
Once PIPP completes processing and exports the .ser file, the sequence is loaded into AutoStakkert! 4 for frame quality grading, multi-point alignment, and stacking.
AutoStakkert! 4
AutoStakkert! 4 (AS!4) is a free application developed by Emil Kraaikamp, and is one of the most widely used tools for stacking planetary, lunar, and solar images. It is available for Windows and can be downloaded from www.autostakkert.com.
The core idea behind stacking is straightforward: when filming the Moon through a telescope, atmospheric turbulence causes the image to constantly blur and distort. By capturing a long video — typically thousands of frames — you end up with a mixture of sharp and blurry frames. AS!4 analyses every frame, ranks them by sharpness, and then aligns and combines only the best ones. The result is a single master image with significantly better detail and a much higher signal-to-noise ratio than any individual frame could provide.
The workflow follows three steps: Open, Analyse, and Stack.
1) Open
Click the Open button and load your video file. AS!4 supports .ser files (the preferred format for planetary imaging) as well as common video formats such as .avi.
Before moving to the next step, configure the following settings on the left panel:
- Stabilisation mode: For lunar imaging always select Surface. This tells AS!4 to track the texture of the lunar surface rather than a single bright point, which is how it would track a planet. Using the wrong mode here will produce a blurry stack.
- Noise Robust: Set this to 2 for typical high-quality lunar video. Higher values can help with very noisy data but may reduce sharpness.
2) Analyse
Click 2) Analyse to begin frame analysis. AS!4 will scan every frame in the video and assign each one a quality score based on sharpness and atmospheric conditions. This may take a minute or two depending on the size of your video file.
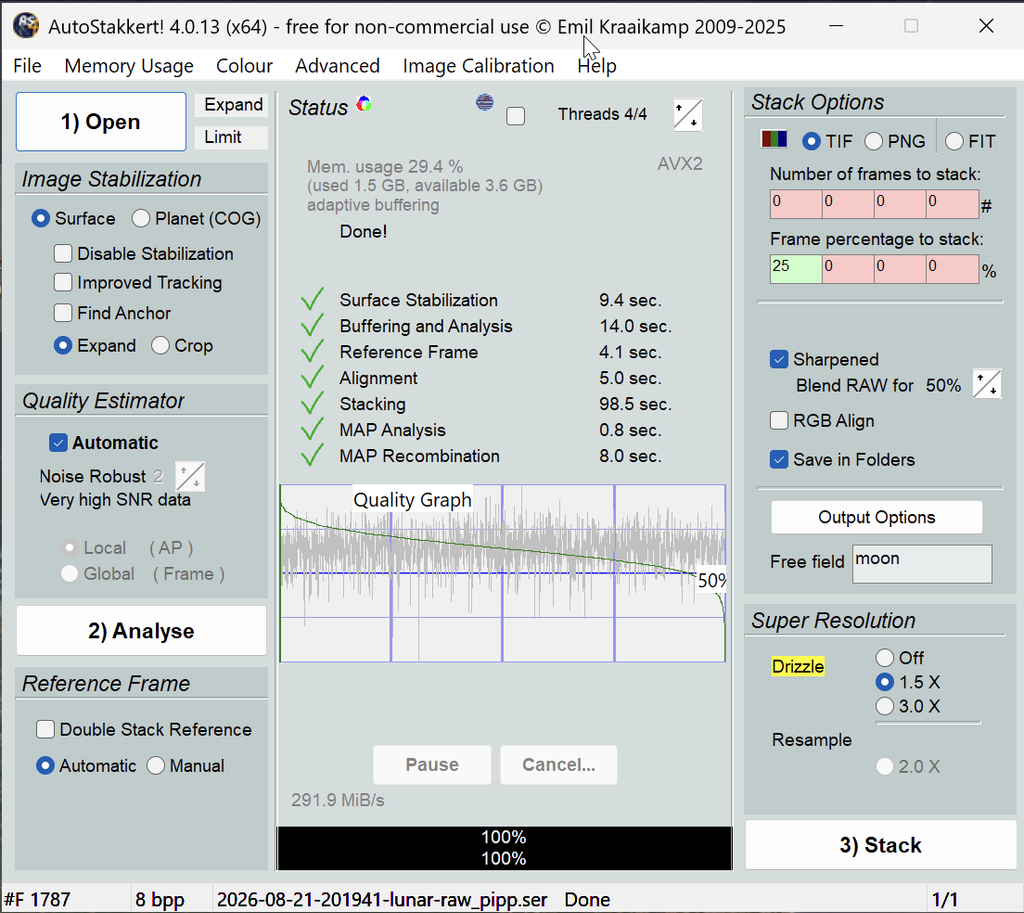
Once analysis is complete, you will see a quality graph appear. The x-axis represents each frame in the video and the y-axis shows its quality score. Ideally you want to see a graph with clear peaks and troughs — this indicates good variation in atmospheric seeing, meaning the best frames are noticeably sharper than the worst ones.
Next, place the Alignment Point (AP) grid:
- Click Place AP grid to automatically distribute alignment points across the image. Aim for around 150 APs for a full lunar disc.
- Alignment points work by tracking small patches of lunar detail independently. This corrects for the fact that atmospheric distortion is not uniform across the whole image — one part of the Moon may be sharp while another is blurry at any given moment.
- Set Min Bright to around 30% to prevent APs from being placed on the dark sky background, where there is no detail to track. APs placed on dark areas will degrade your stack.
- Set AP Size to around 48px as a good starting point. Smaller APs capture finer detail but are more sensitive to noise; larger APs are more stable but less precise.
3) Stack
Before clicking 3) Stack, configure the Stack Options panel on the right:
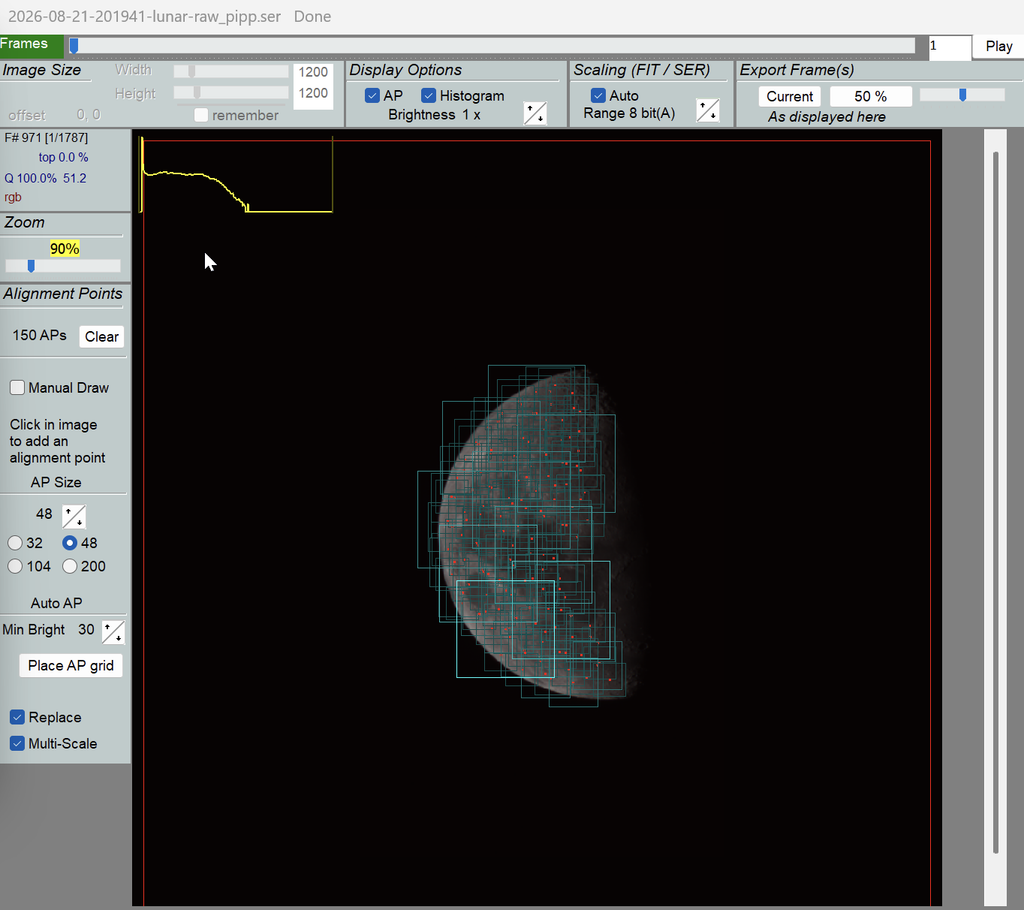
- Frame percentage to stack: Start with 25% — this keeps only the sharpest quarter of your frames. If your seeing conditions were poor, you may need to increase this to 50% or more to have enough frames for a clean result. If seeing was excellent, dropping to 10–15% can yield exceptional detail.
- Output format: Select TIF for maximum bit depth and quality. Avoid JPEG at this stage as it is a lossy format and will discard fine detail.
- Blend RAW for 50%: Enabling this produces a second output file alongside your stack — an unsharpened version that is useful as a reference and can also be used in subsequent processing steps in applications like Siril or LuckyStackWorker.
- Super Resolution: Leave this off unless you are specifically experimenting with it. It upscales the image using sub-pixel information from the stack but can introduce artefacts if not used carefully.
Click 3) Stack to begin. AS!4 will align all selected frames using the AP grid and combine them into a single output image, saved to the same folder as your input file.
The resulting stacked TIF file is your starting point for the next stage of processing — sharpening and detail enhancement using wavelets in Siril or LuckyStackWorker.
- LSW (Lucky Stack Worker) — applies a light deconvolution pass to tighten fine detail before the image goes into Siril
- Load the resulting TIFF into Siril for sharpening and tonal processing
Step 2 — Wavelet Sharpening
Wavelets work by decomposing the image into distinct layers of spatial detail — fine crater rims at one scale, broad maria boundaries at another — and allowing each to be boosted independently. This is far more precise than global sharpening, which amplifies noise and detail equally. The settings below were refined over two rounds of testing across 7 iterations, specifically tuned for the SeeStar S30 Pro’s 30mm aperture.
- Image Processing → Wavelets Control
- Type: BSpline · Number of Layers: 6
| Layer | Value | Scale | Lunar Surface target | Reasoning |
|---|---|---|---|---|
| L1 | 1.20 | Finest | Smallest craterlets and sensor-level micro-detail | Conservative — avoids amplifying noise from the 30mm aperture |
| L2 | 1.60 | Fine | Crater rims, ejecta filaments, fine ray structure | Reduced from 1.80 — higher value produced an artificial over-etched look |
| L3 | 1.25 | Mid-fine | Surface texture, crater floor detail, smaller ray filaments | Settled at 1.25 — 1.20 was slightly soft, 1.30 pushed highland regions too far |
| L4 | 1.50 | Mid | Crater wall terraces, ridge contours, medium topographic features | Increased from 1.40 — adds genuine three-dimensionality to crater walls |
| L5 | 1.20 | Large | Maria shorelines, basin transitions, broad surface boundaries | Confirmed at 1.20 — 1.30 over-cooked the large-scale maria boundaries |
| L6 | 1.00 | Global | Largest-scale tonal features and overall disc shape | Left neutral — boosting here affects contrast, not surface detail |
Step 3 — Curves & Levels
Tonal work always comes after sharpening. Applying curves or levels before wavelet processing would alter the pixel values the algorithm uses to find detail, leading to unpredictable results. Curves shape the midtone response to separate the dark basaltic maria from the brighter highland terrain. Levels sets the final white point.
- Curves — separate maria from highlands and shape the midtone response
- Levels — set the white point and final tonal balance
Step 4 — Export from Siril
Export at full 16-bit depth to preserve all tonal data. If skipping GIMP entirely, this can be the final output file.
- Export as 16-bit TIFF
- Naming convention: YYYY-MM-DD-siril-processed-v1.tif
GIMP Finishing (Optional)
GIMP is used for finishing only — the heavy sharpening is done in Siril. Do not re-sharpen in GIMP, as stacking sharpening passes compounds errors and pushes the image toward an artificial look. Always use Layer → New from Visible between steps rather than Duplicate Layer — duplicating copies only a single layer’s data rather than the true composite result of all layers.
Step 5 — Final Tonal Tweaks (Optional)
Only needed if the Siril output requires minor refinement. Small adjustments here can fine-tune the white point or midtone balance without redoing the full tonal workflow.
- Levels — Colors → Levels — fine-tune white point only if needed
- Curves — Colors → Curves — minor midtone adjustment only if needed
- Use New from Visible for each step, not Duplicate Layer
Step 6 — Mineral Colour Enhancement (Optional)
The Moon’s surface contains real mineral colour — titanium-rich basaltic maria appear subtly blue, while iron-rich highland terrain carries a warm tone. This step isolates and boosts that chrominance using LCh blending, which locks the luminance channel so all the sharpening work from earlier remains untouched. A limb mask is applied to eliminate colour fringing at the edge of the disc.
- Layer → New from Visible → rename to: saturation Master100, B90, C80, Y15
- Set Layer Mode to LCh Color — locks luminance, affects chrominance only
- Colors → Hue-Saturation: Master +100, Blue +90, Cyan +80, Yellow +15
- Layer Opacity: 90%
- Filters → Blur → Gaussian Blur → 2.5–3.0 px — suppresses colour mottling
Limb mask (fringing elimination):
- Select by Color → click black background → Select → Invert
- Select → Shrink → 35 px
- Select → Feather → 15 px
- Right-click layer → Add Layer Mask → Initialize to Selection → Add
- Select → None
Step 7 — Save & Export
Save the full layer stack as an XCF master file before exporting — this preserves every layer for future refinement without reprocessing from scratch. Facebook and most social platforms do not accept TIFF files, so export a high-quality JPG for sharing.
- File → Save As → full layer stack as .xcf (master backup)
- File → Export As → 16-bit PNG or TIFF for archival
- For web/social sharing — export as JPG at 90–95% quality
- Naming convention: YYYY-MM-DD-moon-final-v4.tif